How to Use a Grilling Plank

How to Grill with a Wood Plank
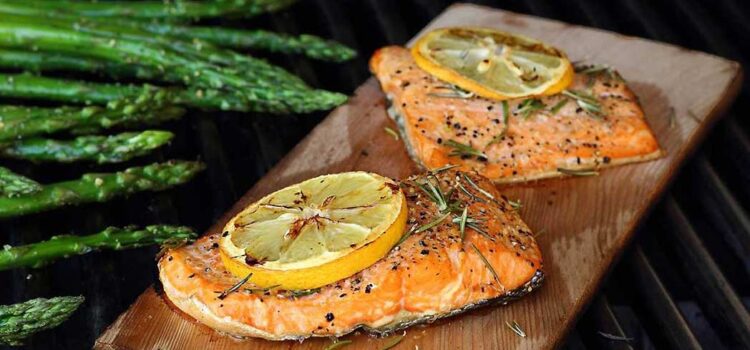
Chefs and home cooks alike go to great lengths to capture the smoky essence of wood in their favorite grilled foods by using aromatic wood chips, mesquite charcoal, even liquid smoke. Yet the most direct and natural way to suffuse fish, meat, poultry and vegetables with the flavor of smoldering timber is to grill them on wood itself. Native Americans in the Pacific Northwest first used slabs of indigenous woods to fire-roast salmon and game. Today, wood planks in many varieties — from sturdy cedar, hickory and alder to sweet maple, cherry and apple — are readily available as platforms for slow and succulent backyard or oven grilling.
Step 1: Select
You can get your hands on a sampler pack of Western maple, Western red cedar and Western alder planks at fine kitchen stores. Remember, each plank should be used only once. By visiting your local hardware store, you could even fashion your own plank by purchasing a cut of your favorite wood — just make sure it hasn’t been treated with chemicals. Choose a plank 12-16 inches long, 6-8 inches wide and about 1 inch thick. Whether you choose store-bought or do-it-yourself, it’s time to toss out that liquid smoke.
Step 2: Prepare
For a divine grilling performance, first you need to properly prepare the stage. Any wood plank you choose must be soaked in advance to prevent it from catching on fire on the grill. This should be done at least one hour in advance but ideally anywhere from four hours to overnight. Submerge the plank in water and weigh it down so it doesn’t float. For a richer soak, you might even add some Chardonnay to the water (especially good if you can find an oak plank from old wine barrels). Aside from deterring fiery flare-ups, soaking is what produces all that wonderful smoke. The damp wood also releases its moisture back into the food, helping it retain juices.
Step 3: Brush
Before placing food on the plank, brush the cooking side lightly with vegetable oil to keep food from sticking. Delicate items or those that cook slowly are the best candidates for your plank: fish fillets, roast chicken, pork roast, corn or even fruit. Allow for 50 percent more cooking time than regular grilling. The plank provides indirect heat like a baking stone, so it isn’t good for quickly-cooked items like steaks that need intense, direct flame.
Step 4: Season
Simply season your food and place the plank in the middle of the grill, then don’t mess with it. No flipping is required because the plank is a heat conductor; all you have to do is baste as desired with barbecue sauce or lemon juice, spray any errant flames with a water bottle and wait patiently. The result is moist, naturally seasoned food with that quintessential smoked wood taste. Plank-cooked fare is also healthier than even traditional grilling because it retains more nutrients and requires less fat to achieve the same juicy results.


